


Chocolate Mousse Cake - Rich Chocolate layered cake with creamy, fluffy and silky chocolate mousse frosting topped off with a shiny chocolate glaze!

I have always wanted to post a celebration cake. But the thing is, whenever I make cakes for birthdays or get together or any such event, I will be in such a hurry that I could hardly take any pictures. So this time I made this cake especially for you all, totally from scratch with lots of step by step pictures right from the cake to the final glaze.
This cake is a must try for all chocolate lovers. It just sings chocolate in every aspect... ( How strange have I become? A singing chocolate cake?/ ) Well the point is, this cake is so well balanced. The creamy and fluffy Chocolate mousse frosting pairs so well with the rich chocolate cake.
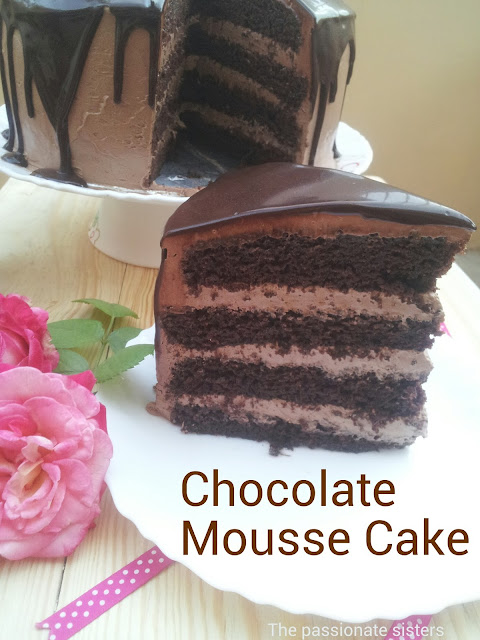
Ok, now lets talk about this Chocolaty goodness in detail...
The Cake - The cake by itself is so chocolaty!! Its rich, moist and perfect for a layer cake. And more importantly very easy to make. Just mix dry ingredients with wet ingredients.
The Chocolate Mousse Frosting - This frosting is beyond everything. Its rich, creamy, fluffy, smooth and more chocolaty as it has two chocolate components - the actual chocolate and the cocoa powder.
The Glaze - The glaze is so shiny and sets perfectly. It too has 2 chocolate components - cocoa powder and chocolate so that you get the wonderful rich colour and taste.

Don't get intimidated by the long post. I just took lots of step by step pictures so that you can all make the cake easily and have fun making and enjoying it:)

Prep time: Cook time:
Total time: Yield: 8 inch Chocolate cake
Ingredients:
For the Cake:
All Purpose Flour: 1 and 3/4 cups
Cocoa Powder: 3/4 cup
Baking Powder: 1 tsp
Baking Soda: 2 tsp
Sugar: 1 and 3/4 cups
Salt: 1 tsp
Curd: 1 cup
Oil: 1/2 cup
Eggs: 2
Vanilla essence: 1 tsp
Hot water: 1 cup
Coffee Powder: 1/4 tsp
For the Chocolate Mousse Frosting:
Milk: 1/2 cup
Egg: 1
Caster Sugar: 1 tbsp
Cocoa Powder: 2 tbsp
Dark Chocolate: 240 g
Heavy Whipping Cream: 2 cups
Powdered Sugar: 4 tbsp
Vanilla essence: 1 tsp
For the Glaze:
Water: 1/4 cup
Sugar: 1/4 cup
Cocoa Powder: 2 tbsp
Milk: 1/4 cup
Corn Flour: 1/2 tbsp
Dark Chocolate: 50 g
Butter: 2 tbsp
My 1 cup measures 240 ml
Recipe Adapted - Sallys Baking Addiction, Full Scoops
METHOD:
For the Cake:
1) Preheat oven to 180 C for 10 minutes. Grease two 8 inch round cake pans with oil. Place a round parchment paper on the bottom of each pan and grease it with oil as well. Dust the pans with flour and remove excess flour.
Sift together flour, cocoa powder, baking powder and baking soda.
2) Transfer to a bowl. Add Sugar and salt and mix well with a whisk.
3) In a separate bowl, beat together oil, eggs and vanilla until combined ( You can also use a whisk ) Now add the curd and beat one more time.
4) Pour the egg mixture into the dry ingredients mix. Slowly beat with the beater. Mix the coffee powder with hot water and add it to the batter. Mix until just combined.
5) The batter will be thin. Pour the batter in the prepared cake pans and bake at 180 C for 25 to 30 minutes or until a toothpick ( or a knife ) inserted in the centre comes out clean.
6) Let the cakes cool in the pan itself for 10 minutes. Run a knife around the edges of the pan and gently turn the pan upside down over a plate. The cake will come out easily. Now gently peel off the parchment paper. Transfer the cakes to a cooling rack to cool completely. Once the cakes are completely cooled to room temperature, wrap them in a cling film and refrigerate until you are ready to do frosting.
For the Chocolate Mousse Frosting:
1) Take the milk in a sauce pan and bring it to a simmer ( no need to boil, just heat until it starts bubbling around the sides of the pan ). In a bowl, mix together egg and caster sugar until combined.
2) Temper the eggs by adding some of the hot milk to the egg mix, all the while whisking the eggs continuously ( This step prevents the egg from scrambling ) Pour the tempered egg back to the sauce pan.
3) Mix in cocoa powder. Over low heat, whisk continuously until the mix gets thickened and coats the back of a spoon.
4) Chocolate cream is now ready. Now pour the hot chocolate cream through a sieve into a bowl of chopped chocolate.
5) Now as you can see, I did not chop my chocolate finely ( sometimes I can be quite lazy! ) So the chocolate did not melt completely, which cost me an additional step. I placed the bowl over a pan simmering water until the chocolate is melted. Let it cool completely.
6) Take the whipping cream in a bowl. Add vanilla and powdered sugar. Whisk until it reaches soft peaks ( as shown in picture ). Now add in the cooled chocolate cream mix and whisk until stiff peaks.( Oops, forgot to take the final mousse picture! I am really sorry! You can see it in the assembling and the final pictures )
For the Glaze:
1) Whisk the water, sugar and cocoa powder in a sauce pan and bring it to a simmer. Meanwhile, mix milk and cornflour together in a bowl so that there are no lumps. Gently pour the cornflour mix into the sauce pan, whisking all the while.
2) In low heat, cook the mixture by stirring all the while, until the mix gets thickened and coats the back of a spoon as shown below ( when you run a finger across the wooden spoon, it should leave a clear path ) Take some grated chocolate in a bowl ( This time, I took time to grate the chocolate so that I don't need to do an extra step by double boiling it :) ) Pour the hot cocoa mix through the sieve into the grated chocolate bowl.
3) Mix until the chocolate is melted. Now add the butter cubes and mix until the glaze in nice and glossy.
Assembling the Cake:
1) Take the cakes out of the refrigerator. Have a cake board ready. Prepare a simple syrup by boiling 3 tbsp water and 3 tbsp sugar in a sauce pan until the sugar dissolves. Transfer to bowl and let it cool to room temperature.
2) Place the cake board in a plate ( if you have a rotating cake stand you can use that ) With the help of a sharp serrated knife, carefully cut one cake horizontally through the centre to make 2 layers. Take the bottom half of the cake and carefully palce that over the cake board. Brush little simple syrup over the cake. Top it with about 3 scoops of chocolate mousse frosting.
3) Spread the frosting evenly across the cake using a spatula. Now start repeating the process. Place the top half of the cake over the frosting and brush it lightly with simple syrup. Top it with frosting.
4) Spread the frosting evenly with a spatula. Now take the second cake and cut it horizontally through the centre to make 2 layers. Take the top layer of the cake and flip it so that that the top is placed over the frosting. Brush with simple syrup and spread the frosting evenly.
5) Now take the last layer and flip that too, so that the bottom of the second cake is on the top now ( this ensures that the top of the cake is nice and even ) Brush lightly with simple syrup and spread the chocolate mousse frosting.
Crumb coat the cake - which is nothing but applying frosting all over the cake covering every holes, sides and corners but very lightly. You don't need to apply a thick frosting now. A light coat will do ( just like the picture below )
After applying the crumb coat, put the cake in the refrigerator for 20 minutes or in the freezer for 5 to 7 minutes to speed up the cooling process.
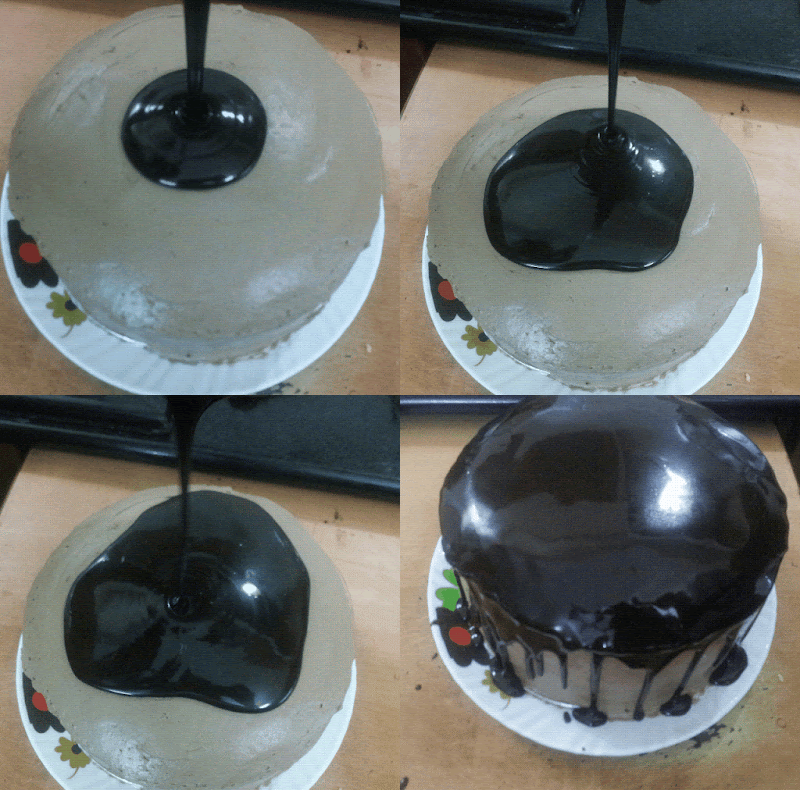
6) Now put some more frosting on the cake and spread it evenly across the cake. Smooth the top and the sides to give it a more finished look. Now pour the glaze over the cake. No need to spread with spatula, the excess will drip on the sides making it even more pretty :) Stop when the top is fully coated. Put it back in the freezer for 5 to 10 minutes until the glaze sets. Store the cake in refrigerator until ready to serve.


Happy cooking,
Sindhiya.
I have always wanted to post a celebration cake. But the thing is, whenever I make cakes for birthdays or get together or any such event, I will be in such a hurry that I could hardly take any pictures. So this time I made this cake especially for you all, totally from scratch with lots of step by step pictures right from the cake to the final glaze.
This cake is a must try for all chocolate lovers. It just sings chocolate in every aspect... ( How strange have I become? A singing chocolate cake?/ ) Well the point is, this cake is so well balanced. The creamy and fluffy Chocolate mousse frosting pairs so well with the rich chocolate cake.

Ok, now lets talk about this Chocolaty goodness in detail...
The Cake - The cake by itself is so chocolaty!! Its rich, moist and perfect for a layer cake. And more importantly very easy to make. Just mix dry ingredients with wet ingredients.
The Chocolate Mousse Frosting - This frosting is beyond everything. Its rich, creamy, fluffy, smooth and more chocolaty as it has two chocolate components - the actual chocolate and the cocoa powder.
The Glaze - The glaze is so shiny and sets perfectly. It too has 2 chocolate components - cocoa powder and chocolate so that you get the wonderful rich colour and taste.

Don't get intimidated by the long post. I just took lots of step by step pictures so that you can all make the cake easily and have fun making and enjoying it:)

Chocolate Mousse Cake
Rich and moist Chocolate Cake layered with a silky, fluffy, creamy Chocolate mousse frosting and finally topped off with a shiny Chocolate glaze!!Prep time: Cook time:
Total time: Yield: 8 inch Chocolate cake
Ingredients:
For the Cake:
All Purpose Flour: 1 and 3/4 cups
Cocoa Powder: 3/4 cup
Baking Powder: 1 tsp
Baking Soda: 2 tsp
Sugar: 1 and 3/4 cups
Salt: 1 tsp
Curd: 1 cup
Oil: 1/2 cup
Eggs: 2
Vanilla essence: 1 tsp
Hot water: 1 cup
Coffee Powder: 1/4 tsp
For the Chocolate Mousse Frosting:
Milk: 1/2 cup
Egg: 1
Caster Sugar: 1 tbsp
Cocoa Powder: 2 tbsp
Dark Chocolate: 240 g
Heavy Whipping Cream: 2 cups
Powdered Sugar: 4 tbsp
Vanilla essence: 1 tsp
For the Glaze:
Water: 1/4 cup
Sugar: 1/4 cup
Cocoa Powder: 2 tbsp
Milk: 1/4 cup
Corn Flour: 1/2 tbsp
Dark Chocolate: 50 g
Butter: 2 tbsp
Recipe Adapted - Sallys Baking Addiction, Full Scoops
METHOD:
For the Cake:
1) Preheat oven to 180 C for 10 minutes. Grease two 8 inch round cake pans with oil. Place a round parchment paper on the bottom of each pan and grease it with oil as well. Dust the pans with flour and remove excess flour.
Sift together flour, cocoa powder, baking powder and baking soda.
 |
 |
 |
2) Transfer to a bowl. Add Sugar and salt and mix well with a whisk.
 |
 |
 |
3) In a separate bowl, beat together oil, eggs and vanilla until combined ( You can also use a whisk ) Now add the curd and beat one more time.
 |
 |
 |
4) Pour the egg mixture into the dry ingredients mix. Slowly beat with the beater. Mix the coffee powder with hot water and add it to the batter. Mix until just combined.
 |
 |
 |
5) The batter will be thin. Pour the batter in the prepared cake pans and bake at 180 C for 25 to 30 minutes or until a toothpick ( or a knife ) inserted in the centre comes out clean.
 |
 |
 |
6) Let the cakes cool in the pan itself for 10 minutes. Run a knife around the edges of the pan and gently turn the pan upside down over a plate. The cake will come out easily. Now gently peel off the parchment paper. Transfer the cakes to a cooling rack to cool completely. Once the cakes are completely cooled to room temperature, wrap them in a cling film and refrigerate until you are ready to do frosting.
 |
 |
 |
For the Chocolate Mousse Frosting:
1) Take the milk in a sauce pan and bring it to a simmer ( no need to boil, just heat until it starts bubbling around the sides of the pan ). In a bowl, mix together egg and caster sugar until combined.
 |
 |
 |
2) Temper the eggs by adding some of the hot milk to the egg mix, all the while whisking the eggs continuously ( This step prevents the egg from scrambling ) Pour the tempered egg back to the sauce pan.
 |
 |
 |
3) Mix in cocoa powder. Over low heat, whisk continuously until the mix gets thickened and coats the back of a spoon.
 |
 |
 |
4) Chocolate cream is now ready. Now pour the hot chocolate cream through a sieve into a bowl of chopped chocolate.
 |
 |
 |
5) Now as you can see, I did not chop my chocolate finely ( sometimes I can be quite lazy! ) So the chocolate did not melt completely, which cost me an additional step. I placed the bowl over a pan simmering water until the chocolate is melted. Let it cool completely.
 |
 |
 |
6) Take the whipping cream in a bowl. Add vanilla and powdered sugar. Whisk until it reaches soft peaks ( as shown in picture ). Now add in the cooled chocolate cream mix and whisk until stiff peaks.( Oops, forgot to take the final mousse picture! I am really sorry! You can see it in the assembling and the final pictures )
 |
 |
 |
For the Glaze:
1) Whisk the water, sugar and cocoa powder in a sauce pan and bring it to a simmer. Meanwhile, mix milk and cornflour together in a bowl so that there are no lumps. Gently pour the cornflour mix into the sauce pan, whisking all the while.
 |
 |
 |
2) In low heat, cook the mixture by stirring all the while, until the mix gets thickened and coats the back of a spoon as shown below ( when you run a finger across the wooden spoon, it should leave a clear path ) Take some grated chocolate in a bowl ( This time, I took time to grate the chocolate so that I don't need to do an extra step by double boiling it :) ) Pour the hot cocoa mix through the sieve into the grated chocolate bowl.
 |
 |
 |
3) Mix until the chocolate is melted. Now add the butter cubes and mix until the glaze in nice and glossy.
 |
 |
 |
Assembling the Cake:
1) Take the cakes out of the refrigerator. Have a cake board ready. Prepare a simple syrup by boiling 3 tbsp water and 3 tbsp sugar in a sauce pan until the sugar dissolves. Transfer to bowl and let it cool to room temperature.
 |
 |
 |
2) Place the cake board in a plate ( if you have a rotating cake stand you can use that ) With the help of a sharp serrated knife, carefully cut one cake horizontally through the centre to make 2 layers. Take the bottom half of the cake and carefully palce that over the cake board. Brush little simple syrup over the cake. Top it with about 3 scoops of chocolate mousse frosting.
 |
 |
 |
3) Spread the frosting evenly across the cake using a spatula. Now start repeating the process. Place the top half of the cake over the frosting and brush it lightly with simple syrup. Top it with frosting.
 |
 |
 |
4) Spread the frosting evenly with a spatula. Now take the second cake and cut it horizontally through the centre to make 2 layers. Take the top layer of the cake and flip it so that that the top is placed over the frosting. Brush with simple syrup and spread the frosting evenly.
 |
 |
 |
5) Now take the last layer and flip that too, so that the bottom of the second cake is on the top now ( this ensures that the top of the cake is nice and even ) Brush lightly with simple syrup and spread the chocolate mousse frosting.
Crumb coat the cake - which is nothing but applying frosting all over the cake covering every holes, sides and corners but very lightly. You don't need to apply a thick frosting now. A light coat will do ( just like the picture below )
After applying the crumb coat, put the cake in the refrigerator for 20 minutes or in the freezer for 5 to 7 minutes to speed up the cooling process.
 |
 |
 |
6) Now put some more frosting on the cake and spread it evenly across the cake. Smooth the top and the sides to give it a more finished look. Now pour the glaze over the cake. No need to spread with spatula, the excess will drip on the sides making it even more pretty :) Stop when the top is fully coated. Put it back in the freezer for 5 to 10 minutes until the glaze sets. Store the cake in refrigerator until ready to serve.
 |
 |
 |
There you go, a wonderful celebration cake just for you...You can make it for birthdays, anniversary, get together or just like that even without any occasion :)

Look at the delicious beauty...

NOTES:
1) Refrigerating the cakes before frosting makes it easy to cut them into layers. You can also make the cake one day earlier and store it in refrigerator.
2)Let the cakes cool completely before applying frosting.
2)Let the cakes cool completely before applying frosting.
3) I used Tropolite whipping cream which is already sweetened a bit. If you are using any other whipping cream, adjust the sweetness accordingly.
4) Make sure that your whipping cream is completely chilled before whipping.
5) Store the cake in the refrigerator. Take it out half an hour before serving.
6) If your cakes are domed, then level the cakes by cutting the dome off before starting assembling.
7) The coffee powder is completely optional. It just makes the cake little more chocolaty. If you don't want it, you can just omit it.

6) If your cakes are domed, then level the cakes by cutting the dome off before starting assembling.
7) The coffee powder is completely optional. It just makes the cake little more chocolaty. If you don't want it, you can just omit it.

Happy cooking,
Sindhiya.


